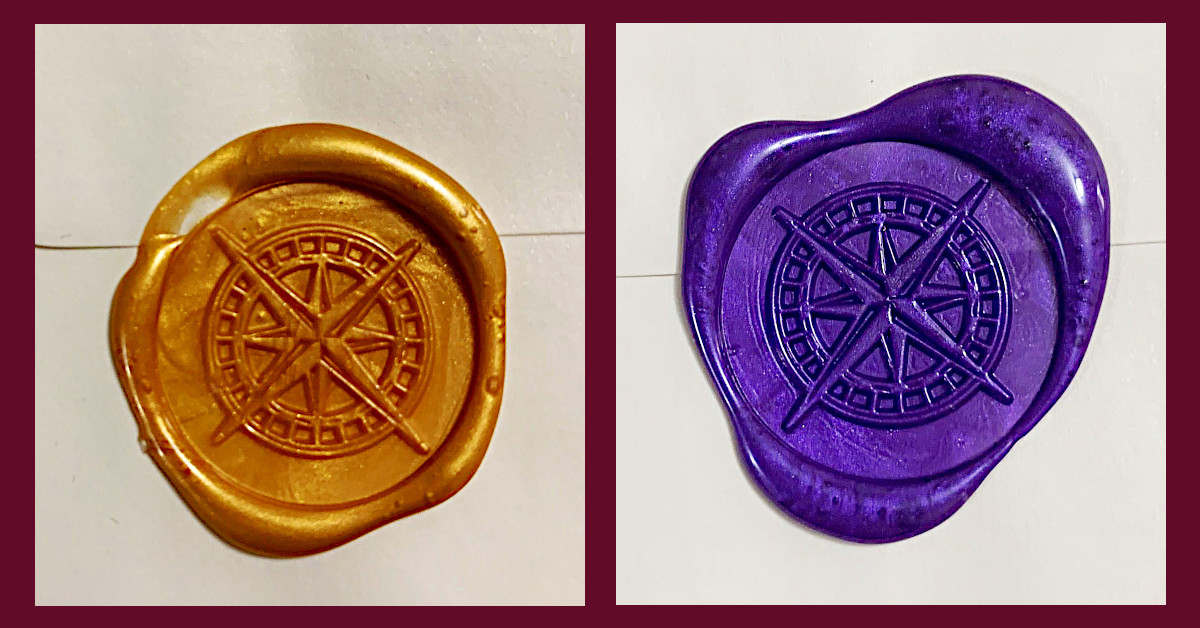
Shortly after I joined Instagram to promote this blog, snailmailkatie‘s amazing handmade wax seals on the outside of her envelopes inspired me to level up my notecrafting skill set by learning how to create my own wax seals (two of which are pictured above). Prior to seeing Katie’s feed, I had thought of wax seals as something that had died out with Victorian England and Imperial China — but in fact, this art form is still very much alive and well in stationery circles.
And fortunately, the barriers to entry are low. If you have a candle, a match, and some tinfoil, you’re already 50% set up. The only remaining items you need besides the actual envelope you want to decorate are sealing wax beads and a melting spoon (which come in sets from Botokon for around $10) and a brass wax seal stamp (also available for about $10).
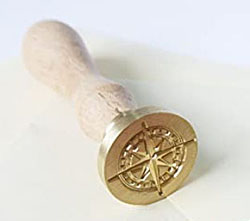
The array of choices in both sealing wax colors and stamp symbols seems limitless. I knew I wanted my wax to be a metallic shade, so I picked gold, silver, and bronze, plus iridescent purple since that’s one of my favorite colors. For my first brass wax seal stamp, I selected the compass rose — which dates back to ancient nautical maps — given that so many people (myself and various folks I write to included) are experiencing areas in our lives where we feel at sea and uncertain of our direction. I also had a powerful experience steering an actual boat under adverse circumstances almost exactly 20 years ago that has stayed with me ever since and made the compass rose part of my personal symbology. (For those interested in that story, I’ve tacked it on in a separate section below.*)
If your curiosity is piqued by the art of wax sealing, here’s a step-by-step guide for beginners, based on what I’ve learned so far.
Round up your supplies
- Candle (a tea light or other candle with a wide base works best) and the means to light it
- 6″ x 6″ sheet of tinfoil (to put underneath the candle)
- Sealing wax beads (you need only 3-4 per seal)
- Melting spoon (and its plastic sleeve — don’t throw that out!)
- Brass wax seal stamp
- Envelope (use some empty test ones for practice first — business-size gives you the most mileage per envelope)
- 1 damp and 1 dry cloth (for cleaning up errant soot)
Set the stage
- Find a hard flat surface with lots of space (like a dining-room table or uncluttered desk)
- Place the candle on the tinfoil sheet, light it, and keep it arm’s width away from where you’re sitting. If you’re right-handed, push it toward the upper right corner of your work surface, and if left-handed, toward the upper left.
- Stand the brass stamp on its base within easy reach of your dominant hand (but not too close to the candle).
- Position the envelope you want to practice on/decorate directly in front of you and moisten it closed (or use the self-adhesive feature if it has one) for best results…otherwise the flap won’t lie flat and may mess up the seal. (Once you’re applying wax seals to “live” pieces of mail, it’s best to limit them to envelopes whose contents have a flat, even texture since bulky mail pieces with wax seals on them can sometimes trip up postal sorting machines.)
- Remove the melting spoon from its plastic sleeve, keep the sleeve at arm’s width away from where you’re sitting (in the opposite direction from the candle), and place 3 sealing wax beads onto the spoon.
Melt the sealing wax
With your dominant hand, hold the melting spoon directly over the flame for about 45-60 seconds. Be forewarned that the closer to the flame you hold the spoon, the sootier the outside of the spoon will get (but the faster the wax will melt). You’ll know the wax is fully melted when you can no longer visually make out the shapes of the individual wax beads.
Pour the wax onto the envelope
Aim for the center of the envelope closure and slowly pour the wax onto it. While I still haven’t identified a foolproof technique, what seems to work most consistently is:
- Don’t rush the pouring! Every second influences the final outcome, and an excessively fast pour can spread the wax too lopsidedly too soon to salvage.
- For the first couple of seconds, try not to micromanage the process — just stay as still as you can and keep pouring slowly and consistently. Maintain a thin but steady stream as you pour, and don’t stop partway through. The wax should start to naturally spread in a circular pattern.
- After a couple of seconds, if you see the pattern start to go a bit wonky and non-circular, you can slowly add a small circular motion to your pour in an attempt to round out lopsided edges…this may or may not improve the final result, though (people with more experience like snailmailkatie incorporate this motion right from the outset, but for beginners, that may backfire).
- Once all the wax is poured out, place the melting spoon onto the tinfoil.
Place the brass stamp onto the melted wax pool
With your dominant hand, hold the brass stamp by the widest part of the handle and aim for the dead center of the wax pool. What seems to work best for me is to hover the base over the pool to the position where the pool is completely (or almost completely) blocked from view…that is the sweet spot. Slowly lower the stamp into the pool and apply light pressure for about 10 seconds. The wax should naturally spread around the circumference of the stamp. The tricky part is getting the distribution of that spread to be relatively even.
Separate the brass stamp from the wax
The brass base of the stamp sticks to the wax as it congeals…this is normal. The key is to remove it gently by keeping pressure on the envelope as a whole with your non-dominant hand and, with your dominant hand, pulling only one side of the handle in a very short yet swift tug (it may not come loose the first time), then doing the same on the other side, and continuing to alternate, until both sides become detached. Then lie the stamp on its side to let the base cool off, but keep it away from the candle since stamp handles are often made of wood.
Hopefully the resulting seal is the way you want it, but if not, keep at it. It really is just a matter of practice. I created my first photo-ready seal during my third sealing session. You’ll eventually find the technique that works best for you.
Keep ’em separated
As you clean up, you may find it helpful to wash and/or wipe the soot off the bottom of the melting spoon before you put it back in its plastic sleeve…otherwise you risk spreading the soot around next time you use the spoon. But even if you don’t get it all off, putting the spoon back in its plastic sleeve (after it’s had a few minutes to cool off) will help mitigate that. A thin layer of melted wax may stick to the inside of the spoon, but it doesn’t really matter and isn’t worth the effort to clean as long as you use the same spoon for the same color of wax beads each time. Whatever small amount of residue remains will just blend in with the new beads when the next melting session occurs. (There are more advanced folks who will purposely melt different colors of wax beads together to get multi-toned, marbled, or otherwise-blended color effects — which can be beautiful — but I’m starting with just basic solid colors for now.)
As for the brass wax seal stamp, interestingly, wax never sticks to the bottom, so that’s one less thing to clean…just make sure the base is cooled off before you pack it up in any plastic.
A delightful demo
As I mentioned above, there are some real pros on Instagram who have elevated the art of wax sealing. Videos from snailmailkatie such as the one below prompted me to explore it on my own. I consider Katie’s feed to be somewhat of a public service, in that you can always count on her for cheerful, visually appealing, tasteful, and inspiring content…which we desperately need right now. I always look forward to her posts.
Getting crafty
Have you thought about upping your stationery game by learning a new craft? Perhaps you might like to try wax sealing, or hand/brush lettering, or washi tape decorating…there are lots of online classes to help you explore! How can you introduce some fun new challenges into your creative efforts?
* Bonus section unrelated to wax seals: a vignette
Oh! You’re still reading! I guess that means you’re interested in the story I mentioned earlier about the experience of being on board a ship in a tricky situation that made the compass rose a special symbol for me.
I once took a private trip on a small sailboat in Maine with a good friend of mine who enjoyed seafaring — it was just the two of us plus the captain. I hadn’t ever been on that kind of craft before and wasn’t at all accustomed to the steep angle at which the boat tilted as it moved, particularly at high speed. I kept feeling like we were going to get dumped into the water any minute and was petrified. I held myself together on the outside and didn’t make a scene or anything, but the captain could see that I was internally freaking out.
Then he insisted that I steer.
That sounded like the craziest thing I could imagine, since it was already all I could do to keep from falling off the boat.
But he persevered and said I would feel better if I took charge, and he kept promising he would jump in if anything went awry, until finally I caved and actually took the wheel.
I thought it was sure to be a recipe for disaster, but the truth was that my concentration was so utterly consumed by attempting not to screw up that I put the abject terror on hold for a bit.
Funnily enough, afterward the captain told me that I had managed to neatly steer around several buoys that were laid out in our vicinity, even though I had no clue there were any around at all. The sun was so dazzlingly bright that I could barely see a thing.
I had almost literally steered blind and somehow navigated my way through the waves and through the fear, and through the waves of fear. When I finally had both feet firmly planted on the ground again and had a few hours to process what had happened, I realized that if I could find my way through that experience, perhaps I could find my way through other big challenges as well.
That was when I adopted the compass rose as one of my personal symbols.

That’s such a great story about navigating the sailboat! It’s understandable that the compass rose would have a special meaning for you, and besides, it makes a striking seal, especially in purple.
LikeLiked by 1 person
I love this! Your wax seals look so cool. And I’m so glad you didn’t leave us hanging with that teaser about the seafaring story, which I LOVED. ❤
LikeLike